Smart Car Robot with Arduino
This project is a multi-functional robot car built using the Arduino platform. It combines three control methods: obstacle avoidance, Bluetooth control, and voice control. The car uses an ultrasonic sensor for navigation, a Bluetooth module for wireless communication, and an L293D motor driver to control the motors. This tutorial will guide you through building this versatile robot car step by step.
Project Features
Control Methods
The robot car can be controlled using three different methods:
Obstacle Avoidance
The car autonomously navigates around obstacles using the ultrasonic sensor.
Bluetooth Control
Control the car remotely using a smartphone app via Bluetooth.
Voice Control
Operate the car using voice commands through the smartphone app.
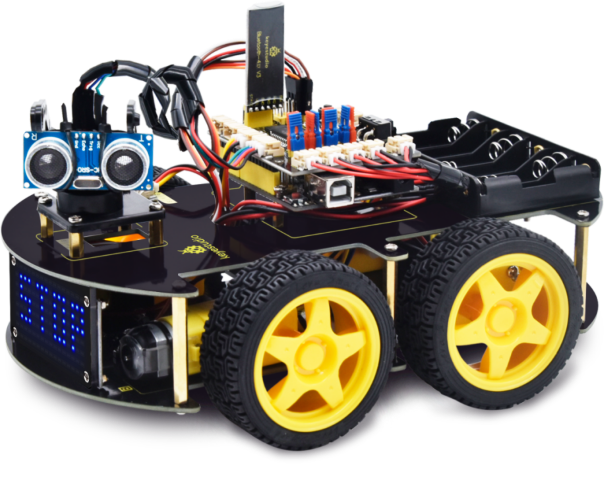
Components List
To build this project, you'll need the following components:
Arduino UNO
The brain of the robot
L293D Motor Driver
Controls the motors
Ultrasonic Sensor
Detects obstacles
Bluetooth Module
HC-05 or HC-06
Servo Motor
For sensor movement
Gear Motors
x4 with wheels
Li-ion Batteries
3x 18650 batteries
Jumper Wires
For connections
Circuit Diagram
The circuit connects the Arduino UNO to the motor driver, ultrasonic sensor, Bluetooth module, and servo motor.
Arduino Code
#include <Servo.h>
#include <AFMotor.h>

#define Echo A0
#define Trig A1
#define motor 10
#define Speed 170
#define spoint 103

char value;
int distance;
int Left;
int Right;
int L = 0;
int R = 0;
int L1 = 0;
int R1 = 0;

Servo servo;
AF_DCMotor M1(1);
AF_DCMotor M2(2);
AF_DCMotor M3(3);
AF_DCMotor M4(4);

void setup() {
    Serial.begin(9600);
    pinMode(Trig, OUTPUT);
    pinMode(Echo, INPUT);
    servo.attach(motor);
    M1.setSpeed(Speed);
    M2.setSpeed(Speed);
    M3.setSpeed(Speed);
    M4.setSpeed(Speed);
}

void loop() {
    // Uncomment the control method you want to use:
    // Obstacle();
    // Bluetoothcontrol();
    // voicecontrol();
}

void Bluetoothcontrol() {
    if (Serial.available() > 0) {
        value = Serial.read();
        Serial.println(value);
    }

    if (value == 'F') {
        forward();
    } else if (value == 'B') {
        backward();
    } else if (value == 'L') {
        left();
    } else if (value == 'R') {
        right();
    } else if (value == 'S') {
        Stop();
    }
}

void Obstacle() {
    distance = ultrasonic();
    if (distance <= 12) {
        Stop();
        backward();
        delay(100);
        Stop();
        L = leftsee();
        servo.write(spoint);
        delay(800);
        R = rightsee();
        servo.write(spoint);

        if (L < R) {
            right();
            delay(500);
            Stop();
            delay(200);
        } else if (L > R) {
            left();
            delay(500);
            Stop();
            delay(200);
        }
    } else {
        forward();
    }
}

void voicecontrol() {
    if (Serial.available() > 0) {
        value = Serial.read();
        Serial.println(value);

        if (value == '\\') {
            forward();
        } else if (value == '-') {
            backward();
        } else if (value == '<') {
            L = leftsee();
            servo.write(spoint);
            if (L >= 10) {
                left();
                delay(500);
                Stop();
            } else if (L < 10) {
                Stop();
            }
        } else if (value == '>') {
            R = rightsee();
            servo.write(spoint);
            if (R >= 10) {
                right();
                delay(500);
                Stop();
            } else if (R < 10) {
                Stop();
            }
        } else if (value == '*') {
            Stop();
        }
    }
}

// Ultrasonic sensor distance reading
int ultrasonic() {
    digitalWrite(Trig, LOW);
    delayMicroseconds(4);
    digitalWrite(Trig, HIGH);
    delayMicroseconds(10);
    digitalWrite(Trig, LOW);
    long t = pulseIn(Echo, HIGH);
    long cm = t / 29 / 2; // Convert time to distance in cm
    return cm;
}

void forward() {
    M1.run(FORWARD);
    M2.run(FORWARD);
    M3.run(FORWARD);
    M4.run(FORWARD);
}

void backward() {
    M1.run(BACKWARD);
    M2.run(BACKWARD);
    M3.run(BACKWARD);
    M4.run(BACKWARD);
}

void right() {
    M1.run(BACKWARD);
    M2.run(BACKWARD);
    M3.run(FORWARD);
    M4.run(FORWARD);
}

void left() {
    M1.run(FORWARD);
    M2.run(FORWARD);
    M3.run(BACKWARD);
    M4.run(BACKWARD);
}

void Stop() {
    M1.run(RELEASE);
    M2.run(RELEASE);
    M3.run(RELEASE);
    M4.run(RELEASE);
}

int rightsee() {
    servo.write(20);
    delay(800);
    Left = ultrasonic();
    return Left;
}

int leftsee() {
    servo.write(180);
    delay(800);
    Right = ultrasonic();
    return Right;
}
Setup Instructions
Obstacle Avoidance Mode
1. Connect car to computer
2. Remove slashes before Obstacle() in loop
3. Disconnect Bluetooth TX/RX wires
4. Upload code and reconnect wires
Bluetooth Control Mode
1. Connect car to computer
2. Remove slashes before Bluetoothcontrol()
3. Disconnect Bluetooth TX/RX wires
4. Upload code and reconnect wires
5. Install control app on smartphone
Project Team
Khaled Wasef
Team Leader
Haitham Hisham
Hardware
Mohamed Magdy
Programming
Basmala Taha
Documentation
Fadia Mohamed
Testing
Suheila Abdelnasser
Design
Project Information
- Category Robotics
- Platform Arduino UNO
- Components 11+ electronic parts
- Control Methods 3 modes
- Complexity Intermediate
- Supervisors Dr. Asmaa Elsakaan, Dr. Asmaa Barakat
Key Specifications
- Obstacle Detection 12cm range
- Motor Speed 170 RPM
- Bluetooth Range 10 meters
- Power Supply 3x Li-ion 18650
- Dimensions 20x15x10 cm
Resources
- Complete Arduino Code
- Circuit Diagram
- Component List
- Control App Download
- Assembly Instructions